For my fourth portfolio project during what is beginning to feel like my tenure as an online coding bootcamp student, I decided to create a tool specifically for my particular track at the Flatiron School—at least that’s what my project started out as, but I’ll save that story for a different blog post. I’m (still) enrolled in Flatiron School’s online software engineering self-paced track and unlike the part-time and full-time cohorts, we aren’t beholden to a set schedule where we have to keep up with the rest of the group week to week. Instead, self-paced students are allotted a 15-month period to complete their coursework and graduate, after which they have the option to purchase time extensions.
When I enrolled at Flatiron School, there was no hard and fast time period in which self-paced students had to complete their coursework, which is part of the reason why I’m still steadily working through the curriculum to this day. I like to jokingly refer to myself as a “lifer.” I made use of this flexible schedule to dive deeper into topics that I didn’t fully understand as well as take advantage of unique opportunities that came my way. However, the flexibility does make it difficult to prioritize coursework over other things such as open source collaboration, networking, and side projects, which is probably another reason why I haven’t completed my coursework yet. Nonetheless, I’ve reached the final stretch and I’m determined to finish this curriculum within the next few months.
Being a self-paced student has its pros and cons, but the main concern of this project is the support we receive from our instructors. When I began this project, we had a team of four dedicated self-paced instructors sharing the duties of holding office hours and conducting topic-based lectures, among other tasks. These sessions were held live over Zoom to enable student interaction and the topic-based lectures were almost always recorded for students who couldn’t attend the original study group session. I experienced some absolutely incredible learning breakthroughs in these study groups that I know I never could have had by watching a video recording alone. Actually, the very fact that Flatiron School provided these study groups was a huge influence in my decision to enroll in their program over another coding bootcamp I was considering.
Since these sessions have impacted my learning experience so profoundly, when I had the idea to create a tool that would fulfill the requirements of the curriculum’s fourth portfolio project and add value to Flatiron’s self-paced student community, I got right to work!
The Original Idea
As I alluded to in the first sentence of this post, right now I’m talking about my original project idea, not what the finished product turned out to be (sound familiar?). Keep that in mind as you read through the rest of this post.
Originally, I wanted to create a web app that would enable Flatiron students in the online self-paced software engineering track to make study group topic requests. They would then be able to see all topic requests and upvote the ones they like. This way the Flatiron instructors would be able to better tell which topics their students need more support with and plan their study groups accordingly.
Models
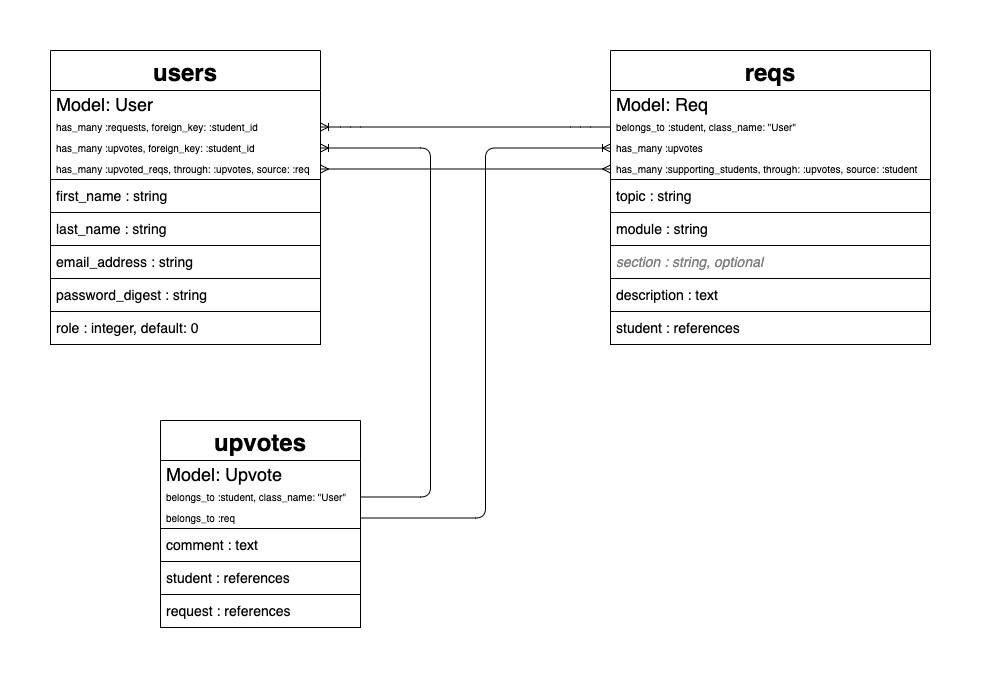
I decided to create three models for this project: User, Upvote, and Req.
Below, you can see my model map which displays each model’s attributes and associations.
Confession Time: Okay, truthfully my original app used the model name Request instead of Req, but when I got to the frontend part of my project I hit a major issue. I had errors popping up all over my console and had no idea where they were coming from! Then I got the notion to look up JavaScript’s reserved words and—what do you know—Request is one of them! I changed it here because I didn’t want to use examples of bad code through my blog post. I promise the rest of this post is all factually accurate, exactly as it happened! ![]()
Enum Attributes
There’s one thing I want to highlight in the User model before we move on. Since this app is meant to be used by different types of users, I created a user enum attribute called role, which assigns the user one of the roles I predefined: student, instructor, or super_admin. See example below:
# app/models/user.rb

class User < ApplicationRecord
  enum role: [:student, :instructor, :super_admin]

  # Alternatively you can use...
  # enum role: { student: 0, instructor: 1, super_admin: 2 }
  # This is a more explicit way of defining an enum attribute
end
NOTE: You must define the enum attribute’s values in the model before adding the enum attribute to the model in the database (aka running a migration). In other words, run your migration for the model as normal except leave out the enum attribute. Then in the model file, define the enum attribute’s values as shown in the example above. Now run another migration adding the enum attribute to your model as an integer value. It’s a good idea to set the default value to 0 as well so that each new instance of the model automatically takes on the first value in the enum attribute’s list of values. Below is the migration code I used to add role as an enum attribute after I created my User model and defined role’s attribute values.
# app/db/migrate/date_add_role_to_users.rb

class AddRoleToUsers < ActiveRecord::Migration[6.0]
  def change
    add_column :users, :role, :integer, default: 0
  end
end
Using the role enum attribute allows the different types of users to interact with the app in different ways depending on which role they’ve been assigned. I won’t go any further into enums, but in the future I plan to write a more detailed post about this handy type of attribute and its many built-in methods.
Associations
As you can see in the model map above, Upvote acts as the join table between Student (an alias for User) and Req. This creates two types of student-owned requests:
-
When a
Studentcreates a newReq# app/models/user.rb class User < ApplicationRecord has_many :reqs, foreign_key: :student_id end# app/models/req.rb class Req < ApplicationRecord belongs_to :student, class_name: "User" end -
When a
Studentcreates anUpvoteon an existingReq# app/models/user.rb class User < ApplicationRecord has_many :upvotes, foreign_key: :student_id has_many :upvoted_reqs, through: :upvotes, source: :reqs end# app/models/upvote.rb class Upvote < ApplicationRecord belongs_to :student, class_name: "User" belongs_to :req end# app/models/req.rb class Req < ApplicationRecord has_many :upvotes has_many :supporting_students, through: :upvotes, source: :student end
The Look and Feel
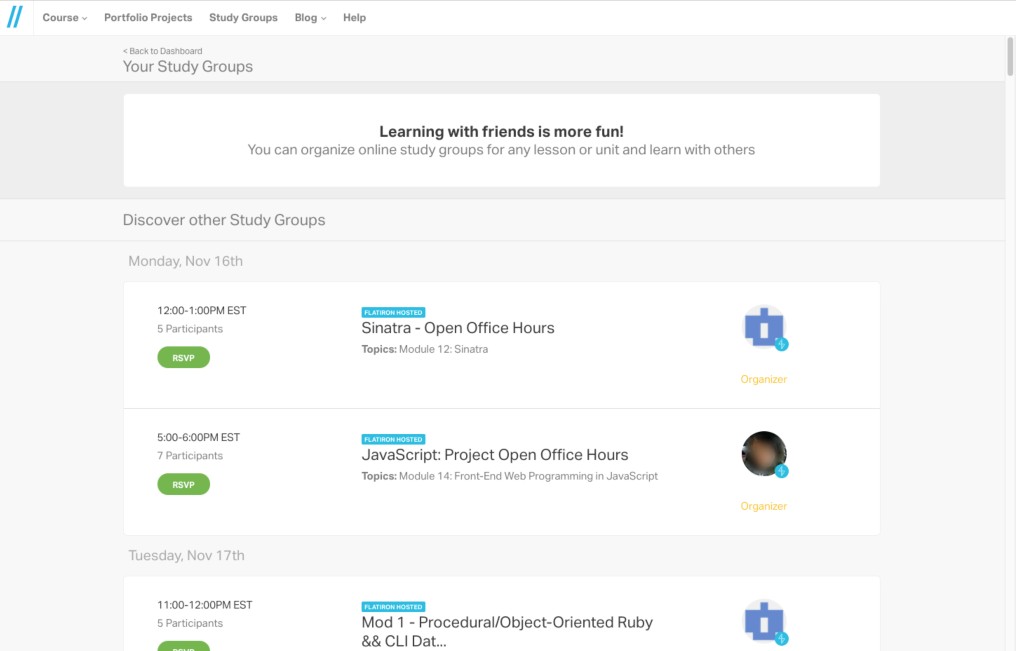
Since this app was targeting a distinct group of people—online self-paced software engineering students at Flation School—I decided to model it after Flatiron’s Learn.co curriculum platform, specifically their login functionality, curriculum topics, and study group dashboard.

User Flow
In my mind, the user flow would go something like this:
Login
The student logs into the web app using their Flatiron School credentials or GitHub OAuth and is immediately directed to the study group dashboard. From there, they have the ability to navigate the app to view other students’ requests or create their own request.
It’s worth noting that creating any type of authentication system was by no means part of the project requirements, but the way my app was designed and modeled made it difficult to picture the app being used without this feature included.
Navigating the App
The study group dashboard has a sidebar which contains a list of Flatiron’s software engineering curriculum modules. This is also how the requests are ordered. Instead of being grouped and ordered by date like Flatiron’s study group dashboard, they’re grouped and ordered by module. The students can either scroll through the dashboard or select an option from the sidebar to jump to that particular module. If they find a request they like, they can click the “Upvote” button, optionally leaving a comment with their upvote. Doing so will add to that request’s total number of upvotes and boost its popularity ranking. The upvote will then appear at the top of the dashboard along with the student’s other upvotes and any requests they themselves had previously created.
Creating a New Request
Once the student has logged in, they’ll see a “Create a New Request” button in the menu bar. Clicking this will open a modal form in which the student can input the request topic, select the appropriate module from a dropdown menu, and provide further information about the request in the description textarea field. Upon clicking “Submit”, the modal disappears, the study group dashboard scrolls to the module that was input via the form’s dropdown menu, and an alert is triggered asking the student to make sure they’re not submitting a duplicate request (the alternative being to upvote and leave a comment on the request they would be duplicating). The student then either opts to cancel their request, edit their request, or submit their request as is. Their request will then appear at the top of the dashboard along with their previously submitted requests and any upvotes they’ve created on other students’ requests.
Logout
Also upon login, a “Logout” button will appear in the menu which the student can click to be logged out of the web app. Again, this is not part of the project requirements but if you have a login… you gotta have a logout too.
In the End
Ultimately, I did not go forward with this particular plan. There were several reasons why, which as I said earlier could be a blog post on its own—and maybe it will be some day. Instead, I created a very similar app with almost identical functions, but instead the resulting study sessions are meant to be a “crowdsourced” activity. Hopefully I’ll be able to find or create a community that will really embrace this idea of self-teaching and I can see where it goes. Until then, I plan to redesign my finished project to be more easily expandable and find something slightly more sophisticated than vanilla JavaScript to use when building the frontend.
